


Ripchord is a free MIDI plugin for creating and remixing chord progressions. You can create custom chord presets from scratch, load expansion packs, or import any MIDI file that contains chords and Ripchord will automatically create a preset from it. Ripchord helps you easily compose progressions by playing single notes to trigger full chords.
Expansion Packs
We fully support any producers that want to make chord expansion packs for Ripchord, and we never take a cut of the sales. You are free to make and give away or sell expansion packs as you see fit without any further permission or cosign required.
Open Source
Ripchord is open source under GNU GPLv3. You can check out the source code on Github
Plugin Formats
Ripchord is avalailable as an AU or VST3 for Mac, and a VST3 for Windows. We get a lot of requests for a VST2 version of Ripchord. Actually the first version of Ripchord we made was a VST2, and then we found out that Steinberg would not let us give it to anyone. Steinberg stopped granting any new VST2 licenses in 2018 because they are trying to retire the format, so unfortunately that is the end of the story. This also means that whatever DAW you use must support the full VST3 MIDI spec in order to use Ripchord. VST2 is Discontinued
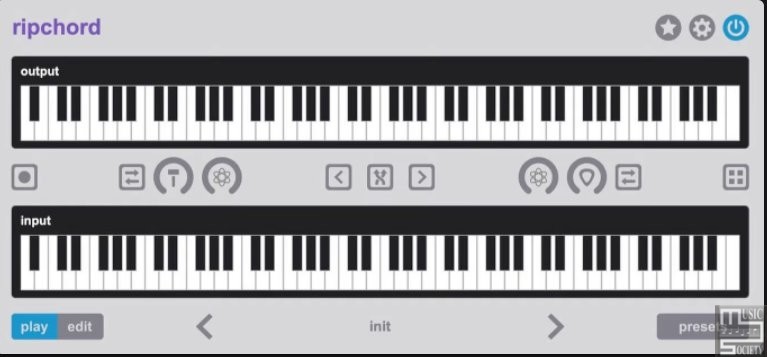
Play Mode
Ripchord has two modes, play and edit. Most of the time you will be in play mode, in which you can either play an external MIDI keyboard, or click on the input keys with a mouse, in order to trigger the chords in your preset and compose progressions.
![Trackbout - Ripchord (Chord Progressions Suite) v2.7.0 x64 VST3 AU WiN MAC [FREE] screenshot](https://audioz.download/uploads/posts/2022-05/1653900219_public.jpg)
1. Clicking this button will favorite or unfavorite the currently loaded preset.
2. Clicking this button will open the menu.
3. Clicking this button allows the chords to be enabled or disabled while maintaining the MIDI routing.
4. This button will contain any MIDI that has been recorded. When it is fully illuminated you can click and drag the MIDI from this button into your DAW.
5. Clicking this button will switch between the presets view and the keyboards view.
6. The name of the currently loaded preset will be displayed here.
7. The left and right arrows can be used to select the next or previous presets in your collection. You can also use the left, right, up, and down keys on your computer’s keyboard to trigger these buttons.
8. Clicking this button will switch between play and edit mode.
9. Clicking this button once will enable MIDI recording. When enabled, recording will begin the moment the first input note is recieved. Clicking this button a second time will disable MIDI recording.
10. Clicking this button will switch the direction of the velocity strum between always LTR, always RTL, LTR then alternate, or RTL then alternate. It can only be clicked if the velocity strum knob has been engaged.
11. Turning this knob will increase the velocity strum, which means the difference in velocity between the first and last notes of a chord. The difference will be spread evenly across all of the notes.
12. Turning this knob will increase the velocity humanization, which means to introduce random variations in velocity between all of the notes in the chord.
13. Clicking this button will move the transpose keys to the left on the input keyboard. It can only be clicked if the transpose button has been engaged.
14. Clicking this button will engage the transpose keys. When engaged, the bottom two octaves of the input keyboard will operate in latch mode to transpose the chords in the preset up or down one full octave.
15. Clicking this button will move the transpose keys to the right on the input keyboard. It can only be clicked if the transpose button has been engaged.
16. Turning this knob will increase the note humanization, which means to introduce random variations in timing between all of the notes in the chord.
17. Turning this knob will increase the note strum, which means the difference in timing between the first and last notes of a chord. The difference will be spread evenly across all of the notes.
18. Clicking this button will switch the direction of the note strum between always LTR, always RTL, LTR then alternate, or RTL then alternate. It can only be clicked if the note strum knob has been engaged.
Edit Mode
Edit mode can be used to create a new preset from scratch, or to edit an existing preset. In edit mode, when you mouse click on the input keys, instead of triggering the chord, it will select the input key so that you can assign or modify the output keys that are mapped to it. You can still trigger the chords in edit mode if you have an external MIDI keyboard hooked up, that way you can preview the chords as you edit them.
![Trackbout - Ripchord (Chord Progressions Suite) v2.7.0 x64 VST3 AU WiN MAC [FREE] screenshot](https://audioz.download/uploads/posts/2022-05/1653900507_public.jpg)
1. Typing here will give the currently selected chord a name. This input will only be present if at least one output note has been mapped to the currently selected chord.
2. Typing here will give the current preset a name.
3. Clicking this button will shift all of the input keys that have chords assigned to them to white keys.
4. Clicking this button will shift all of the input keys that have chords assigned to them to the left.
5. Clicking this button will save any changes that have been made to the current preset.
6. Clicking this button will shift all of the input keys that have chords assigned to them to the right.
7. Clicking this button will shift all of the input keys that have chords assigned to them to black keys.
8. Not pictured. You can right click on input keys that have chords assigned to them to cut, copy, and paste those chords to different input keys.
Presets
This view allows you to easily organize and access your Ripchord presets. Presets are at the core of what Ripchord does. If no preset is loaded, Ripchord essentially does nothing.
![Trackbout - Ripchord (Chord Progressions Suite) v2.7.0 x64 VST3 AU WiN MAC [FREE] screenshot](https://audioz.download/uploads/posts/2022-05/1653900604_public.jpg)
2. Clicking this button will enable tag selection mode so you can assign tags to presets. More than one tag can be assigned to the same preset.
3. Clicking a tag will hide any presets that do not have that tag. More than one tag can be selected at once, which will display the union of their tagged presets.
4. Clicking this button will hide any presets that have not been favorited.
5. Typing here will filter out presets that don’t match the text that has been entered.
6. Clicking this button will switch between the presets view and the keyboards view.
7. Clicking this button will favorite or unfavorite a preset.
8. Clicking this button will delete a preset. There is a confirmation step before the preset is deleted.
![Trackbout - Ripchord (Chord Progressions Suite) v2.7.0 x64 VST3 AU WiN MAC [FREE] screenshot](https://audioz.download/uploads/posts/2022-05/thumbs/1653900766_public.jpg)
2. In tag selection mode, clicking a tag will make it the active tag that presets will be assigned to. Only one tag can be active at a time.
3. In tag selection mode, if there is an active tag selected, clicking on a preset will assign the active tag to it. More than one tag can be assigned to the same preset.
![Trackbout - Ripchord (Chord Progressions Suite) v2.7.0 x64 VST3 AU WiN MAC [FREE] screenshot](https://audioz.download/uploads/posts/2022-05/thumbs/1653901045_public.jpg)
2. Clicking this button will begin the process of resetting the plugin to its default size. To complete the process, you must close and reopen the plugin.
3. Clicking this button will unload the currently loaded preset and initialize an empty one.
4. Clicking this button will initialize a new, unnamed preset by making a copy of the currently loaded preset. It can only be clicked if a preset is currently loaded.
5. Clicking this button will open a file selection dialogue so you can import a single MIDI file, or multiple MIDI files at once. Ripchord will parse the MIDI files and automatically generate presets from them.
6. Clicking this button will open a location selection dialogue so you can export the currently loaded preset as a MIDI file. It can only be clicked if a preset is currently loaded.
7. Clicking this button will open a file selection dialogue so you can import a single preset file, or multiple preset files at once. To import multiple files, hold down the shift key while selecting them.
8. Clicking this button will open a location selection dialogue so you can export the currently loaded preset. It can only be clicked if a preset is currently loaded.
9. Clicking this button will open a file selection dialogue so you can import a single MPC file, or multiple MPC files at once. Ripchord will parse the MPC files and automatically generate presets from them.
Visits: 1

